Get Your Rubber Duckies In A Row
Madeline Kaye (5NCX) (Consultant: Geek)
SAINTCON 2025 · Day 1 · Main Track 1
Overview
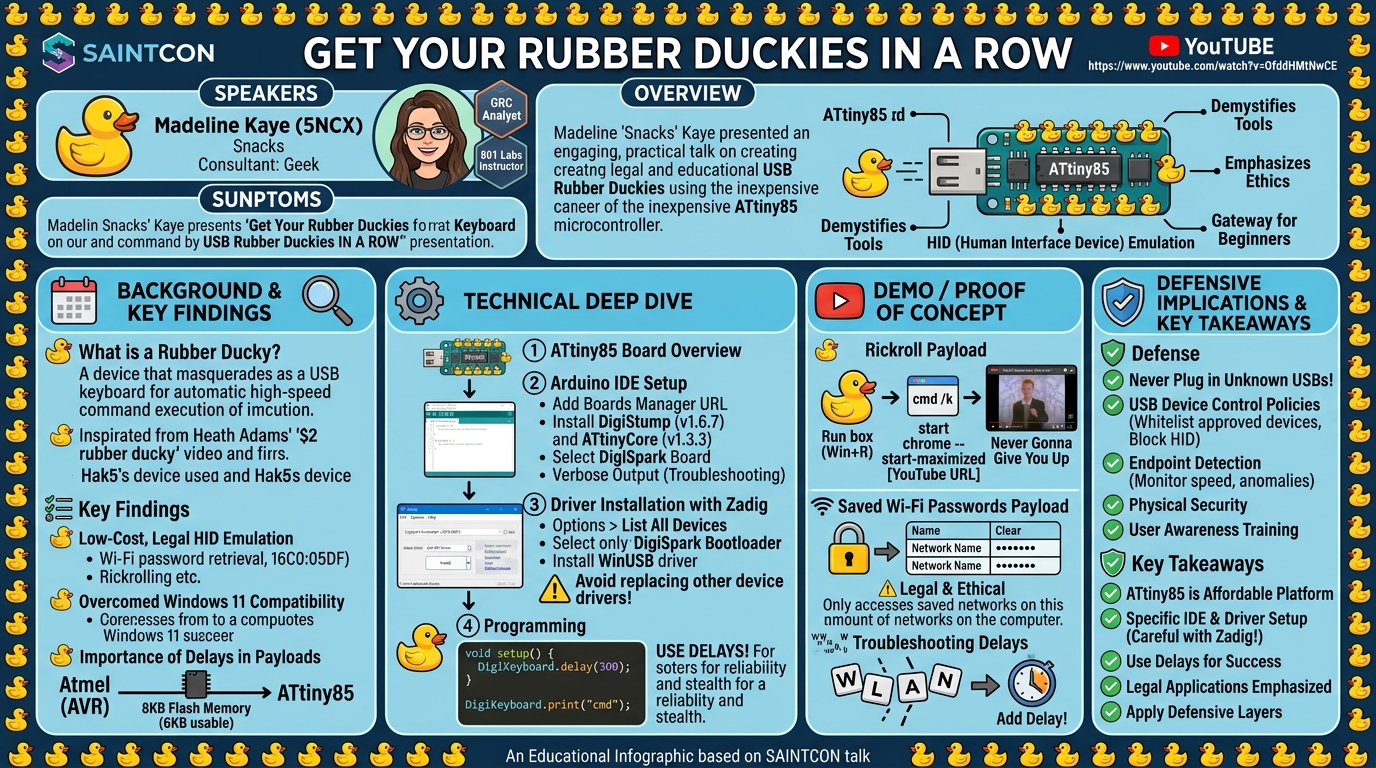
Madeline Kaye, known as "Snacks," presented an engaging and highly practical talk at SAINTCON titled "Get Your Rubber Duckies In A Row," focusing on the creation of USB rubber duckies using the inexpensive ATtiny85 microcontroller. As a GRC analyst and instructor at 801 Labs, Kaye brings a unique perspective, emphasizing the legal and educational applications of these devices. The presentation served as an excellent gateway into the world of Arduino programming and hardware hacking for beginners, demonstrating how to transform a common microcontroller into a powerful automated input device.
Key moments
- 0:00 Introduction and speaker background
- 2:00 Why choose ATtiny85 for rubber ducky projects
- 2:50 Talk agenda and important safety disclaimer
- 4:00 Detailed look at the ATtiny85 dev board
- 4:50 Understanding the ATtiny85 naming convention
- 6:30 Programming vs. running the rubber ducky board
Get Your Rubber Duckies In A Row
Speakers: Madeline Kaye (5NCX) (Consultant: Geek)
Conference: SAINTCON
YouTube: https://www.youtube.com/watch?v=OfddHMtNwCE
Overview
Madeline Kaye, known as "Snacks," presented an engaging and highly practical talk at SAINTCON titled "Get Your Rubber Duckies In A Row," focusing on the creation of USB rubber duckies using the inexpensive ATtiny85 microcontroller. As a GRC analyst and instructor at 801 Labs, Kaye brings a unique perspective, emphasizing the legal and educational applications of these devices. The presentation served as an excellent gateway into the world of Arduino programming and hardware hacking for beginners, demonstrating how to transform a common microcontroller into a powerful automated input device.
The core of the talk revolved around transforming a small, affordable ATtiny85 development board into a device that emulates a keyboard, allowing it to execute pre-programmed keystrokes and commands upon insertion into a computer. What sets Kaye's approach apart is her background in the legal field, which strongly influenced her decision to focus on demonstrating payloads that are entirely legal and non-malicious, such as retrieving saved Wi-Fi passwords or initiating a Rickroll. This talk is significant because it demystifies a common penetration testing tool, making its underlying principles accessible while promoting ethical and responsible exploration of its capabilities.
By providing a hands-on guide to setting up the Arduino Integrated Development Environment (IDE), managing drivers with Zadig, and coding simple payloads, Kaye empowers attendees to build their own "rubber duckies." The presentation also delves into the practical challenges encountered during development, particularly with Windows 11 compatibility, and offers valuable troubleshooting tips. This detailed technical walkthrough, combined with a clear emphasis on ethical use, makes "Get Your Rubber Duckies In A Row" a standout resource for anyone interested in dipping their toes into hardware security or simply understanding how these fascinating devices work.
Background
▶ Watch: Introduction and speaker background (0:00)
The concept of a "rubber ducky" in cybersecurity refers to a device that masquerades as a standard USB keyboard but, upon insertion, automatically types a series of commands or scripts at high speed. This allows for rapid execution of actions on a target system without direct user interaction, often bypassing security measures that rely on human interaction or traditional malware detection. The most famous commercial example is the USB Rubber Ducky by Hak5. Madeline Kaye's talk was inspired by Heath Adams (TCM Security) and his "$2 rubber ducky" video, which highlighted the potential of low-cost microcontrollers for this purpose.
The ATtiny85 is a popular choice for such projects due to its compact size, low cost, and sufficient processing power and memory for simple tasks. It's part of the AVR microcontroller family, originally developed by Atmel (hence the "AT" in ATtiny). The "tiny" designation indicates it's a smaller, more resource-constrained version compared to the "mega" AVR series (like the ATmega328P found in Arduino Uno). The "8" in ATtiny85 refers to its 8 kilobytes (KB) of flash memory, though only about 6KB is typically usable for user programs due to the bootloader. The "5" is simply a model number within the series. This flash memory is crucial as it stores the program that the rubber ducky will execute.
The problem that ATtiny85-based rubber duckies address is the need for a cheap, easily programmable, and discreet device to automate keyboard inputs. Traditional keyboards are Human Interface Devices (HIDs), and computers generally trust input from HIDs. By emulating a keyboard, the ATtiny85 can inject keystrokes directly into the system, opening applications, executing commands, or even downloading malicious payloads (though Kaye strictly focuses on legal applications). The challenge, as highlighted in the talk, comes from the fact that these are third-party boards, not official Arduino hardware, requiring specific setup procedures, driver installations, and compatibility considerations, especially with newer operating systems like Windows 11.
Key Findings
▶ Watch: Talk agenda and important safety disclaimer (2:50)
Madeline Kaye's presentation effectively demonstrated that creating a functional and ethical USB rubber ducky using an ATtiny85 development board is achievable for beginners, provided they follow precise setup and configuration steps. The key findings and contributions of her talk can be summarized as follows:
- Low-Cost, Legal HID Emulation: The ATtiny85 offers an extremely affordable platform for Human Interface Device (HID) emulation. Kaye explicitly designed her demonstrations to be legal and non-malicious, showcasing how these devices can be used for convenience (e.g., retrieving saved Wi-Fi passwords) or harmless pranks (e.g., a Rickroll), thereby demystifying the technology without promoting illicit use.
- Overcoming Windows 11 Compatibility: A significant challenge with these older, third-party microcontrollers is their compatibility with modern operating systems. Kaye provided a tested and reliable methodology for getting ATtiny85 boards to work on Windows 11, which often presents more difficulties than Windows 10. This involved specific Arduino IDE configurations and driver management strategies.
- Critical Role of Driver Management with Zadig: The talk underscored the absolute necessity of using a third-party tool like Zadig to replace generic USB drivers with the correct ones (specifically WinUSB for the DigiSpark Bootloader). This step is crucial for the computer to correctly recognize and communicate with the ATtiny85 board during the programming phase. Kaye detailed the risks associated with Zadig, such as accidentally replacing drivers for other essential devices, emphasizing the need for caution and precise selection.
- Specific Board and Core Versions: Successful programming hinges on selecting the correct versions of board managers and cores within the Arduino IDE. Kaye found that DigiStump AVR Boards version 1.6.7 and ATtinyCore version 1.3.3 (by Spence Konde) were the most reliable combinations across various test environments, highlighting that newer versions might not always be compatible or stable for these specific boards.
- Importance of Delays in Payloads: A crucial technical insight for effective rubber ducky programming is the strategic use of delays within the code. Insufficient delays can lead to commands being executed before the operating system is ready, resulting in incomplete or failed actions. Kaye demonstrated a "faulty" payload where a lack of proper delays caused the command prompt to misinterpret input, emphasizing that delays not only ensure reliability but can also mimic human typing speed to potentially evade basic behavioral detection mechanisms.
- Accessibility and Troubleshooting: The presentation provided a clear, step-by-step guide for setup, accompanied by practical troubleshooting advice for common issues like unrecognized boards or failed uploads. This focus on hands-on learning and problem-solving makes the process accessible even for those new to microcontrollers and embedded systems.
Technical Deep Dive
▶ Watch: Detailed look at the ATtiny85 dev board (4:00)
Creating an ATtiny85-based rubber ducky involves a precise sequence of software setup, driver installation, and code deployment using the Arduino IDE. The technical process, as detailed by Madeline Kaye, focuses on leveraging specific tools and configurations to ensure compatibility and functionality.
1. ATtiny85 Board Overview:
The core component is the ATtiny85 development board, which typically features the actual ATtiny85 microcontroller chip, a USB connector, and minimal supporting circuitry. The "AT" signifies its origin from Atmel, the "tiny" indicates it's a compact AVR microcontroller, and the "85" denotes its 8KB of flash memory, of which approximately 6KB is available for user code due to the pre-loaded bootloader. This bootloader is essential for enabling the board to be programmed via USB. The board communicates as a USB HID (Human Interface Device), specifically emulating a keyboard.
2. Arduino IDE Setup:
The Arduino IDE is the primary environment for writing and uploading code to the ATtiny85.
- Installation: Download the latest stable version of Arduino IDE (e.g., 2.3.6 mentioned in the talk) from Arduino.cc. Kaye noted that while she presented on Windows, Linux packages are also available, though her specific code examples were Windows-oriented.
- Preferences and Board Manager URL: The first critical step is to configure the IDE to recognize third-party boards. Navigate to
File > Preferences(orArduino > Preferenceson macOS). In the "Additional Boards Manager URLs" field, add the URL for the DigiStump AVR Boards. This URL provides the necessary board definitions for the ATtiny85. - Board Manager Installation: After adding the URL, go to
Tools > Board > Boards Manager. Search for and install "DigiStump AVR Boards". Kaye specifically recommended version 1.6.7 for reliability. Additionally, the "ATtinyCore" by Spence Konde should be installed, with Kaye recommending version 1.3.3 as the latest versions proved problematic in her testing. - Board Selection: Once installed, select the correct board under
Tools > Board. For DigiStump, choose "DigiSpark (Default 16.5mhz)." Kaye pointed out that thePortoption might remain grayed out, which is a common occurrence and generally not an impediment to uploading code. - Verbose Output: For troubleshooting, enabling "Show verbose output during compile" and "Show verbose output during upload" in
Preferencesprovides detailed error messages, which are invaluable for diagnosing issues.
3. Driver Installation with Zadig:
The most critical and potentially hazardous step is installing the correct USB drivers using Zadig. This is necessary because Windows might not automatically install the correct driver for the ATtiny85's bootloader.
- Zadig Download: Download Zadig version 2.9 from its official website. Kaye cautioned users about ads on the download page and the inherent risks of this tool.
- Driver Replacement:
- Open Zadig. Initially, the device list will be blank.
- Go to
Options > List All Devices. - Plug in the ATtiny85 board.
- From the dropdown list, carefully select "DigiSpark Bootloader". Kaye stressed the importance of selecting only this device, as Zadig can replace drivers for any USB device (camera, mouse, keyboard), potentially rendering them inoperable. The USB ID for DigiSpark boards is typically 16C0:05DF.
- Ensure the target driver is set to "WinUSB".
- Click "Replace Driver" or "Install Driver." This process can take a few minutes.
- Kaye also mentioned that sometimes, hidden "Unknown USB Device" entries in Device Manager might need to be deleted before retrying the Zadig process.
4. Programming the ATtiny85:
With the IDE set up and drivers installed, the board is ready for code.
- Code Structure: Arduino sketches (programs) typically have two main functions:
void setup(): Runs once when the program starts, used for initial configurations.void loop(): Runs continuously aftersetup()completes, containing the main logic.- DigiKeyboard Library: To emulate a keyboard, the code utilizes the DigiKeyboard library. This library provides functions like
DigiKeyboard.print("text"),DigiKeyboard.sendKey(KEY_ENTER),DigiKeyboard.delay(milliseconds). - Delays: Kaye emphasized the critical role of
DigiKeyboard.delay()calls. Delays of 300-400 milliseconds were recommended. Without sufficient delays, the ATtiny85 can "type" commands faster than the operating system can process them, leading to errors. For example, trying to typeWLANimmediately after opening Command Prompt might result inW L A Nif the window isn't fully ready. Delays also help mimic human typing speeds, potentially making the device less detectable by behavioral analysis systems. - Upload Process:
- Ensure the ATtiny85 board is unplugged.
- Verify the code (checkmark icon in Arduino IDE).
- Click the "Upload" arrow icon.
- The IDE will prompt "Plug in device now." This is the cue to plug the ATtiny85 into a USB port.
- The upload process will then commence, typically within a 60-second window. A "micronucleus done. Thank you." message at the bottom indicates a successful upload.
The ability to program virtually any command-line or PowerShell sequence into the ATtiny85, coupled with careful delay management and proper driver installation, forms the technical backbone of creating these versatile HID devices.
Demo / Proof of Concept
▶ Watch: Understanding the ATtiny85 naming convention (4:50)
Madeline Kaye provided a live demonstration of creating and running two distinct payloads on the ATtiny85 rubber ducky, showcasing both a fun, harmless prank and a utility function, all while adhering to her commitment to legal and ethical use.
1. Rickroll Payload:
The primary demonstration involved programming the ATtiny85 to initiate a Rickroll. This payload is designed to open a web browser and navigate to the famous "Never Gonna Give You Up" music video on YouTube.
- Mechanism: Upon insertion, the rubber ducky:
- Opens the Run box (Windows Key + R).
- Types
cmd /kand presses Enter. This opens a Command Prompt window and keeps it open (/k). - Within the Command Prompt, it executes
start chrome --start-maximized [YouTube URL]. This command launches Google Chrome, maximizes the window, and navigates to the specified Rickroll URL. - Live Demonstration: Kaye walked through the process of copying the code from her GitHub repository, pasting it into the Arduino IDE, verifying it, and then uploading it to the ATtiny85 board. After successful upload, she plugged the device into a test laptop, and the sequence of opening the Run box, Command Prompt, and then the maximized Chrome window playing the Rickroll video executed as planned, much to the audience's amusement.
2. Saved Wi-Fi Passwords Payload:
Kaye also introduced another payload available on her GitHub: a script to display saved Wi-Fi passwords. She explicitly highlighted that this is a legal utility because it only retrieves passwords for networks the computer has already connected to and saved. It cannot be used to discover passwords for unknown networks.
- Mechanism: This payload would likely involve commands such as
netsh wlan show profile name="[SSID]" key=clearwithin the Command Prompt to reveal the stored password for a specific network, or a loop to list all profiles and their keys. - Ethical Stance: This particular demonstration strongly reinforced Kaye's legal background, ensuring that even a potentially sensitive action like password retrieval was framed within an ethical, self-auditing context rather than a malicious one.
3. The Importance of Delays – A Troubleshooting Insight:
During the live demo, Kaye intentionally (or perhaps serendipitously, as often happens in live demos) showcased a "faulty" rubber ducky where the internal delays were not set properly.
- Problem: When this problematic device was plugged in, it attempted to type commands too quickly. For instance, when trying to execute a command starting with
WLAN, the output in the Command Prompt appeared asW L A Nor similar fragmented input. This occurred because the device began typing before the Command Prompt window was fully initialized or ready to receive input at that speed. - Lesson Learned: This real-time troubleshooting moment served as a powerful illustration of why
DigiKeyboard.delay()calls are critical. Proper delays ensure that each command is fully processed by the operating system before the next one is injected, preventing errors and ensuring the payload executes reliably. It also subtly hints at how behavioral detection systems might flag unnaturally fast typing.
4. Physical Form Factor:
Kaye mentioned the use of 3D-printed cases for the ATtiny85 boards, which can make them look like ordinary USB drives. This aspect, while not directly part of the code, is crucial for the discreet deployment of rubber duckies, whether for pranks or more serious penetration testing scenarios. She noted that many designs are available on platforms like Printables.
Overall, the demo successfully illustrated the end-to-end process of developing and deploying an ATtiny85 rubber ducky, highlighting both the technical steps and common pitfalls, particularly the critical role of well-timed delays.
Defensive Implications
▶ Watch: Programming vs. running the rubber ducky board (6:30)
While Madeline Kaye's presentation explicitly focused on the legal and ethical use of ATtiny85-based rubber duckies, the underlying technology is a classic Human Interface Device (HID) attack vector. Therefore, understanding how these devices work is crucial for developing robust defensive strategies.
- Never Plug in Unknown USB Devices: The most fundamental and critical defense against any USB-based attack, including rubber duckies, is a strict policy of never plugging unknown USB devices into corporate or personal computers. This includes "found" USB drives, which are often left intentionally in public spaces as a social engineering tactic. User education on this principle is paramount.
- Implement USB Device Control Policies: Organizations should implement USB device control policies through Group Policy Objects (GPOs), Endpoint Detection and Response (EDR) solutions, or dedicated device control software. These policies can:
- Whitelist specific USB devices: Only allow approved USB devices (identified by Vendor ID, Product ID, and Serial Number) to connect.
- Block HID devices: Restrict or disable the automatic recognition of new HID devices, especially those that aren't standard keyboards or mice.
- Disable USB auto-run: While less common now, ensuring auto-run features are disabled prevents execution of programs from USB drives.
- Endpoint Detection and Response (EDR) Solutions: Modern EDR solutions can potentially detect and mitigate rubber ducky attacks by monitoring for anomalous behavior:
- Unusual Typing Speed: While Kaye mentioned using delays to mimic human typing, EDRs can still flag typing speeds that are consistently too fast or perfectly consistent, especially if the delays are not sufficiently randomized.
- Rapid Command Execution: EDRs can detect a rapid sequence of system commands (e.g., opening
Run, thencmd, thenstart chrome) that deviates from typical user behavior. - Process Monitoring: Monitoring for unusual processes being launched or unauthorized changes to system configurations can alert defenders to an active attack.
- Physical Security: Enhancing the physical security of workstations is a straightforward defense. Locking workstations when away and securing physical access to computers prevents an attacker from simply walking up and plugging in a rubber ducky.
- User Awareness and Training: Regular security awareness training for employees is vital. This training should cover:
- The dangers of "found" USB devices.
- The concept of HID attacks and how they can bypass traditional security.
- Reporting suspicious devices or incidents.
- Principle of Least Privilege: Ensure users operate with the principle of least privilege. If a rubber ducky executes commands, it will do so with the privileges of the logged-in user. Limiting user privileges can restrict the potential damage an attacker can inflict. For instance, if a user cannot open a command prompt or install software, the rubber ducky's capabilities are severely curtailed.
By combining these technical controls with strong security policies and continuous user education, organizations can significantly reduce their susceptibility to HID attacks like those demonstrated using the ATtiny85.
Key Takeaways
- The ATtiny85 microcontroller offers a highly affordable and accessible platform for creating USB Human Interface Devices (HIDs) that emulate keyboards.
- Setting up the Arduino IDE for ATtiny85 requires specific configurations, including adding third-party Board Manager URLs and installing precise versions of DigiStump AVR Boards (v1.6.7) and ATtinyCore (v1.3.3).
- Zadig is a critical tool for installing the correct WinUSB driver for the DigiSpark Bootloader, but extreme caution is advised to avoid inadvertently replacing drivers for other essential USB devices.
- Effective rubber ducky payloads necessitate strategic use of delays (e.g., 300-400 milliseconds) within the code to ensure commands are processed correctly by the operating system and to potentially mimic human typing for stealth.
- While the technology can be used for malicious purposes, the talk highlighted legal and ethical applications, such as retrieving saved Wi-Fi passwords or executing harmless pranks like a Rickroll, promoting responsible exploration.
- From a defensive standpoint, the talk underscores the importance of USB device control policies, user education against plugging in unknown USBs, and Endpoint Detection and Response (EDR) solutions to detect anomalous typing patterns or command execution.
About the Speaker(s)
Madeline Kaye, who goes by the handle "Snacks," is a GRC (Governance, Risk, and Compliance) analyst. Her professional background also includes experience in the legal field, which heavily influences her ethical approach to cybersecurity demonstrations. Kaye is an aspiring bug bounty hunter, aiming to delve deeper into technical security aspects within the next five years. Beyond her GRC role, she is actively involved in the cybersecurity community as an instructor at 801 Labs, a hacker space in Utah. At 801 Labs, she initially started as a presenter and is now contributing to the development of more structured classes. Her passion lies in technology, cybersecurity, and coding, and she actively engages with communities on platforms like LinkedIn and Discord.