So you wanna know how to make badges
c0ldbru
DEF CON 32 Creator Stage · Day 1 · Creator Stage
Overview
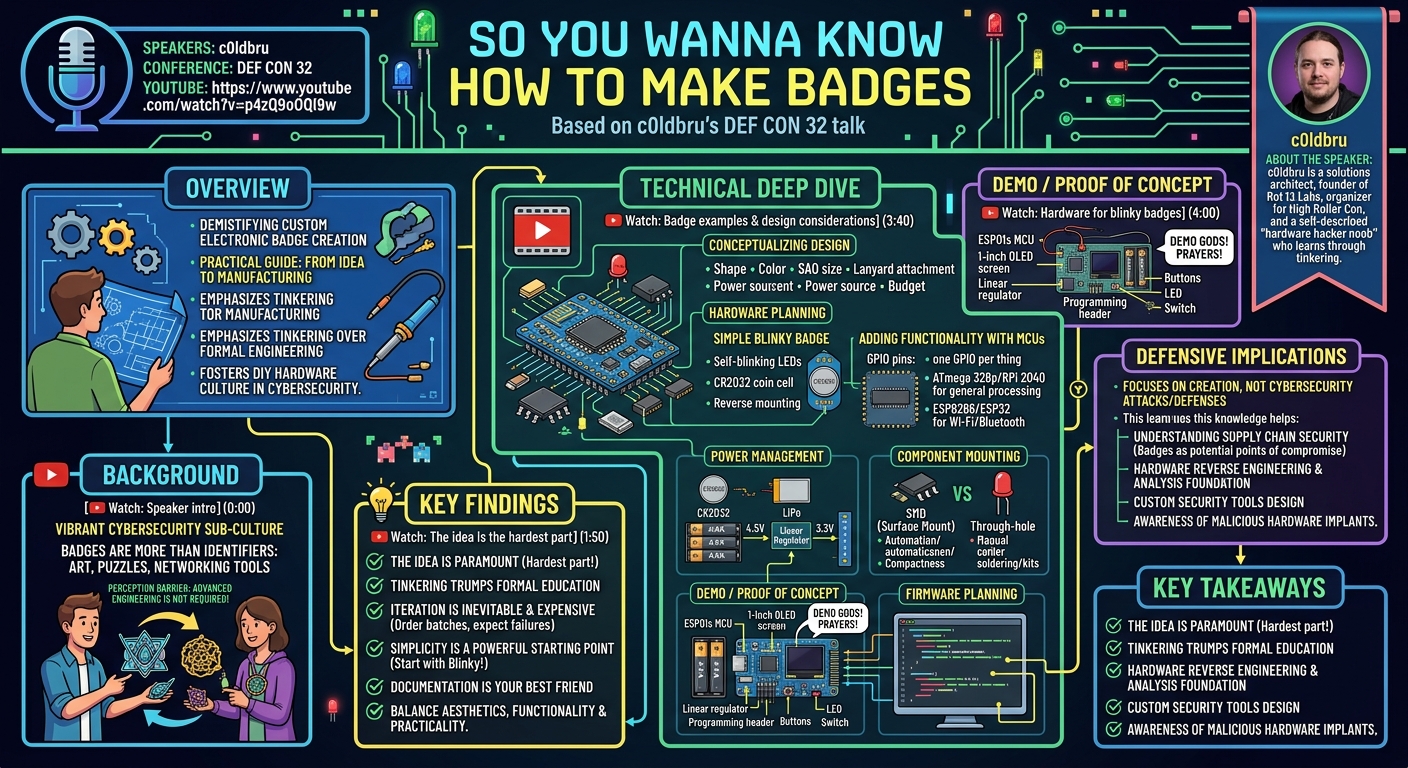
In "So you wanna know how to make badges," c0ldbru, a solutions architect and the founder of Rot 13 Labs, delivered a practical and inspiring talk aimed at demystifying the process of creating custom electronic badges. Far from being an electrical engineer, c0ldbru frames himself as a "hardware hacker noob" who learned through persistent tinkering, emphasizing that badge making is an accessible skill for anyone willing to invest time and effort. The presentation serves as a comprehensive guide, breaking down the complex endeavor into manageable steps: from conceptualizing an idea to planning hardware, firmware, packaging, and budgeting, culminating in the actual manufacturing process.
Key moments
- 0:00 Speaker intro and 'anyone can make badges' philosophy
- 0:50 Overview of the badge making process
- 1:50 Why a good idea is the hardest part
- 3:40 Examples of custom badges and design considerations
- 4:00 Planning hardware for simple blinky badges
- 5:00 Understanding General Purpose Input Output (GPIO)
So you wanna know how to make badges
Speakers: c0ldbru
Conference: DEF CON 32
YouTube: https://www.youtube.com/watch?v=p4zQ9oOQl9w
Overview
In "So you wanna know how to make badges," c0ldbru, a solutions architect and the founder of Rot 13 Labs, delivered a practical and inspiring talk aimed at demystifying the process of creating custom electronic badges. Far from being an electrical engineer, c0ldbru frames himself as a "hardware hacker noob" who learned through persistent tinkering, emphasizing that badge making is an accessible skill for anyone willing to invest time and effort. The presentation serves as a comprehensive guide, breaking down the complex endeavor into manageable steps: from conceptualizing an idea to planning hardware, firmware, packaging, and budgeting, culminating in the actual manufacturing process.
The talk is particularly relevant within the cybersecurity conference ecosystem, where custom electronic badges have evolved from simple identifiers into intricate interactive art pieces, puzzles, and networking tools. c0ldbru's approach addresses a common barrier to entry for many enthusiasts: the perception that advanced engineering knowledge is required. By sharing his personal methodology and highlighting common pitfalls and practical solutions, he empowers attendees to transform their creative visions into tangible, functional hardware. This talk matters because it fosters a culture of DIY hardware development, encouraging innovation and personal expression within the technical community, and making the often-intimidating world of electronics design more approachable for the curious hacker.
Background
▶ Watch: Speaker intro and 'anyone can make badges' philosophy (0:00)
The phenomenon of custom electronic badges is a vibrant subculture deeply embedded in the identity of major cybersecurity conferences like DEF CON. What began as simple identifiers has blossomed into an intricate ecosystem of community-driven hardware projects, each often telling a story, presenting a puzzle, or offering unique interactive features. These badges serve as much more than just conference passes; they are collector's items, conversation starters, and sometimes even platforms for capturing flags or engaging in hardware-based challenges. The allure lies in their blend of artistic design, electronic engineering, and often, a touch of hacker ethos.
Despite the widespread appreciation for these intricate devices, the actual process of designing and manufacturing them often remains a mystery to many. The perception is that one must possess a deep understanding of electrical engineering, PCB design, and embedded programming to even begin. c0ldbru directly challenges this notion, positioning himself as a "hardware hacker noob" who acquired his skills through self-directed learning and iterative experimentation. His talk is born out of numerous post-DEF CON conversations where people expressed curiosity about his badge-making process. The speaker's primary motivation is to democratize this knowledge, demonstrating that with a good idea, a willingness to tinker, and a structured approach, anyone can create compelling custom badges. This talk aims to bridge the gap between admiration for these hardware creations and the practical steps required to produce them, making the craft accessible to a broader audience.
Key Findings
▶ Watch: Why a good idea is the hardest part (1:50)
While not a research presentation, c0ldbru's talk presents several "key findings" in the form of crucial principles and practical insights for anyone venturing into badge making. These findings are derived from his personal experience and iterative development process, offering a realistic roadmap for aspiring hardware creators:
- The Idea is Paramount: The most significant "finding" is that coming up with a good idea is unequivocally the hardest and most critical step in badge creation. As c0ldbru quotes Alt Beer, "the hardest part of making badges is coming up with the good idea." Once the core concept is solidified and excites the maker, the subsequent technical steps (hardware, firmware, design) become significantly easier, as they primarily involve research, documentation, and systematic problem-solving.
- Tinkering Trumps Formal Education: c0ldbru explicitly states he is "not an electrical engineer" and learned through "tinkering." This underscores the finding that formal qualifications are not a prerequisite for successful hardware development. A hands-on, experimental approach, combined with a willingness to learn from documentation and failures, is presented as a viable and effective path.
- Iteration is Inevitable and Expensive: Badge making is rarely a "one-shot" process. The speaker highlights that iteration is a fundamental part of the development cycle. It's common for initial prototypes to fail, requiring significant re-evaluation and subsequent orders of new components or PCBs. This leads to the related finding that budgeting for multiple iterations and recognizing the financial commitment (ordering batches of five or more, rather than single units) is crucial. "Be prepared to dump some money into this," he advises, acknowledging that mistakes can be costly.
- Simplicity is a Powerful Starting Point: For beginners, c0ldbru advocates starting simple. The concept of a "blinky" badge, utilizing only self-blinking LEDs and a CR2032 coin cell, demonstrates that compelling effects can be achieved without complex microcontrollers or extensive firmware. These self-blinking LEDs often integrate a resistor, further simplifying the Bill of Materials (BOM) and assembly.
- Documentation is Your Best Friend: Throughout the talk, the implicit finding is the critical importance of reading and understanding component documentation. Whether selecting an MCU for specific Wi-Fi/Bluetooth capabilities or understanding power requirements, thorough documentation review prevents costly mistakes and guides design decisions.
- Balance Aesthetics and Functionality with Practicality: Design considerations extend beyond just looks or features. Factors like size (e.g., SAO, or "Shitty Add-On" compatibility), lanyard attachment points (single vs. dual hooks), power requirements, and component mounting (SMD vs. Through-hole) all significantly impact the manufacturing process, cost, and user experience. The choice between SMD (Surface Mount Devices) and Through-hole components, for instance, can drastically affect assembly time, especially for large production runs (e.g., soldering 30,000 duck SAOs), highlighting a trade-off between ease of DIY assembly and mass production efficiency.
These insights collectively form a foundational understanding for anyone looking to enter the realm of custom badge creation, emphasizing creative vision, practical planning, and a resilient, iterative mindset.
Technical Deep Dive
▶ Watch: Examples of custom badges and design considerations (3:40)
The technical core of c0ldbru's talk revolves around the practical considerations and component choices involved in bringing a badge idea to life. He systematically breaks down the hardware and firmware planning, offering concrete examples and advice for different levels of complexity.
Conceptualizing the Design
Before diving into components, the speaker stresses the importance of a clear design vision. Key questions to consider include:
- Aesthetics: What shape, color, and size should the badge be? This includes considering integration with existing standards like SAOs (Shitty Add-Ons), which are small, interchangeable modules common at conferences.
- Lanyard Integration: How will the badge hang? Single or dual hooks?
- Functionality: Will it simply "blink," or will it feature more "intense features" like Wi-Fi, Bluetooth, or sensors?
- Power Source: This dictates size and complexity, ranging from small CR2032 coin cells for simple designs to larger LiPo batteries or multiple AAA batteries for more demanding features.
- Budget: All technical choices must align with a realistic budget, especially considering the need to order in batches and iterate on designs.
Hardware Planning: From Blinky to Brainy
The hardware planning phase is critical, balancing desired features with component selection and power management.
Simple Blinky Badges
For badges with minimal functionality, the design can be incredibly streamlined:
- LEDs: The primary component. c0ldbru highly recommends self-blinking LEDs, which have an integrated blinking circuit and often a built-in resistor. This significantly reduces the Bill of Materials (BOM) and simplifies the circuit, making them ideal for beginners.
- Power: A single CR2032 coin cell is often sufficient for powering simple LED arrays.
- Reverse Mounting: For aesthetic flair, LEDs can be reverse mounted on the back of the PCB to shine through the board, creating a diffused glow effect, as demonstrated with one of his past badges featuring blue and red LEDs.
Adding Functionality with Microcontrollers (MCUs)
When more complex behavior is desired, a microcontroller (MCU) becomes necessary.
- General Purpose Input/Output (GPIO): The fundamental interface for MCUs. A GPIO pin is a General Purpose Input Output pin on the MCU that can be configured to read input (e.g., from a button or sensor) or drive an output (e.g., light an LED or control a display). As a rule of thumb, plan for "one GPIO per thing that you want it to do," though advanced techniques can sometimes multiplex functionality.
- Processing Power: For general-purpose functionality and moderate processing, c0ldbru recommends beginner-friendly yet powerful MCUs such as the ATmega 328p (found in many Arduino boards) or the RPi 2040 (the core of the Raspberry Pi Pico).
- Wireless Connectivity: For badges requiring Wi-Fi or Bluetooth, specific MCUs are needed:
- ESP8266 Series: Primarily provides Wi-Fi connectivity. The ESP01s is highlighted as a very small, easy-to-solder option with limited I/O but sufficient for basic Wi-Fi tasks.
- ESP32 Series: Generally offers both Wi-Fi and Bluetooth capabilities.
- Documentation Check: Crucially, c0ldbru stresses the importance of checking the documentation for any ESP series chip, as not all variants will offer the exact same feature set (e.g., some ESP32 models might omit Bluetooth).
Power Management
The power source and its regulation are critical for stability and component compatibility:
- Battery Selection:
- CR2032: Small, convenient for low-power, blinky badges.
- LiPo (Lithium Polymer): Offers higher capacity and voltage for more complex, power-hungry badges.
- AAA Batteries: For the live demo, c0ldbru opted for AAA batteries, which typically provide 1.5V each. Using three in series yields 4.5 volts.
- Voltage Regulation: Many MCUs and components (like the ESP01s) operate at 3.3 volts. If the battery source provides a higher voltage (e.g., 4.5V from AAAs), a linear regulator is essential to step down the voltage to the required 3.3V, preventing damage to sensitive components.
Component Mounting: SMD vs. Through-hole
The choice between Surface Mount Devices (SMD) and Through-hole components impacts both manufacturing and user assembly:
- SMD: Components are soldered directly onto pads on the surface of the PCB. They allow for smaller, more compact designs and are ideal for automated assembly.
- Through-hole: Components have leads that pass through holes in the PCB and are soldered on the opposite side. These are generally easier for manual soldering, making them popular for DIY kits or badges intended for user assembly.
- Trade-offs: c0ldbru shares a personal anecdote about the High Roller Con duck SAOs, where they initially chose through-hole components to make them easier for attendees to solder. However, when faced with manually soldering "30,000 of these" (though they scaled back to 1,000), the difficulty of mass-producing through-hole components became a significant regret, highlighting the importance of considering scale.
Firmware Planning
While the talk primarily focuses on hardware, c0ldbru briefly mentions the need to "plan out your firmware to make sure that the hardware can actually do the things you want it to do." This implies that the software logic must be designed in tandem with the hardware capabilities, ensuring that the chosen MCU has enough processing power, memory, and compatible libraries to execute the desired functions (e.g., driving an OLED screen, connecting to Wi-Fi, responding to button presses).
By carefully considering these technical aspects, from initial concept to component selection and assembly methods, badge makers can navigate the complexities of hardware development and create functional and engaging electronic badges.
Demo / Proof of Concept
▶ Watch: Planning hardware for simple blinky badges (4:00)
c0ldbru dedicated a segment of his talk to setting up a live demonstration, emphasizing his commitment to showing the practical application of his badge-making principles. While the full execution of the demo is not detailed in the provided transcript (which concludes with the speaker transitioning into the demo phase), the components and intended setup for the proof of concept are clearly outlined.
The demo aimed to build a functional badge featuring Wi-Fi connectivity and a display, illustrating a more complex badge than a simple blinky LED version. The specific components chosen for this demonstration badge were:
- ESP01s Microcontroller: This small, cost-effective module from the ESP series was selected for its integrated Wi-Fi capabilities. Despite having only a few I/O pins, it's sufficient for many badge functions and is noted for being "easy to work with" and "very simple to solder, especially for first-time solderers."
- 1-inch OLED Screen: A compact OLED screen was included to provide visual output, allowing the badge to display information or interact with the user beyond just blinking lights.
- AAA Batteries: Power for the badge was supplied by three AAA batteries, yielding a total of 4.5 volts.
- Linear Regulator: Since the ESP01s and other components typically operate at 3.3 volts, a linear regulator was essential to step down the 4.5V from the batteries to the required 3.3V, ensuring the longevity and correct operation of the sensitive electronics.
- Programming Header: A small header was integrated into the design to facilitate programming the ESP01s with the necessary firmware.
- Basic User Interface Components: Simple buttons, an additional LED, and a switch were also part of the design, allowing for user interaction and basic visual feedback.
The speaker expressed his intention to "crank through as much of this badge as possible" during the live demo, praying to the "demo gods" for a smooth execution. The goal was to tangibly illustrate the integration of these components into a working prototype, showcasing how a functional, Wi-Fi-enabled badge could be assembled from off-the-shelf parts following the planning principles discussed. Although the transcript doesn't detail the demo's successful completion, the setup itself serves as a clear proof of concept for building a moderately complex, interactive electronic badge.
Defensive Implications
▶ Watch: Understanding General Purpose Input Output (GPIO) (5:00)
c0ldbru's talk, "So you wanna know how to make badges," is fundamentally an educational guide focused on the creative and engineering aspects of custom hardware development, rather than a presentation on cybersecurity vulnerabilities or exploits. As such, it does not directly present "defensive implications" in the traditional sense of identifying threats, vulnerabilities, or specific mitigation strategies for digital systems. The objective is to empower individuals to create hardware, not to secure existing systems or defend against attacks.
However, understanding the principles of hardware design and manufacturing, as taught by c0ldbru, can indirectly benefit cybersecurity defenders in several ways:
- Supply Chain Security: A deeper understanding of component selection, PCB design, and manufacturing processes can help defenders better assess the security of hardware in their own supply chains. Knowing how badges are made provides insight into potential points of compromise, such as counterfeit components, unauthorized modifications, or insecure firmware flashing during production.
- Hardware Reverse Engineering & Analysis: For security researchers and hardware hackers, understanding the "how-to" of badge creation provides foundational knowledge for how to break or analyze similar custom hardware. Recognizing common MCUs, power architectures, and I/O configurations is crucial for reverse engineering unknown devices, identifying potential backdoors, or extracting firmware for analysis.
- Custom Security Tools: Defenders often need specialized hardware for tasks like network monitoring, signal analysis, or physical access control bypassing. The skills outlined in this talk—from idea generation to selecting MCUs and managing power—are directly applicable to designing and building custom security tools tailored to specific defensive needs.
- Awareness of Malicious Hardware: While not explicitly discussed, knowing how relatively simple it is to integrate components like Wi-Fi modules (e.g., ESP01s) or microcontrollers into custom form factors can raise awareness among defenders about the potential for malicious hardware implants. A seemingly innocuous device could, with the right design, become a data exfiltration tool or a command-and-control endpoint.
In summary, while the talk itself is not about defensive cybersecurity, the knowledge imparted regarding hardware design and manufacturing is a valuable foundational skill that can enhance a defender's overall understanding of physical and embedded system security.
Key Takeaways
- The Idea is Everything: The most challenging and crucial step in badge making is conceptualizing a compelling and exciting idea. Once the idea is solid, the technical execution becomes a more manageable process of research and tinkering.
- Anyone Can Do It: Formal electrical engineering qualifications are not required. A willingness to tinker, read documentation, and iterate through failures is sufficient for successful badge creation.
- Budget for Iteration: Hardware development is rarely perfect on the first try. Be prepared for multiple design revisions and the associated costs of ordering small batches of PCBs and components.
- Start Simple with "Blinky" Badges: For beginners, utilizing self-blinking LEDs and CR2032 coin cells offers a straightforward entry point, providing visual functionality without the complexity of microcontrollers.
- Choose MCUs Wisely for Functionality: For advanced features, select microcontrollers like the ATmega 328p or RPi 2040 for processing, and ESP8266 (Wi-Fi) or ESP32 (Wi-Fi/Bluetooth) for wireless connectivity, always checking their specific documentation.
- Power Management is Key: Understand battery options (CR2032, LiPo, AAA) and the necessity of linear regulators to step down voltage (e.g., 4.5V from AAAs to 3.3V for an ESP01s) for component compatibility and longevity.
About the Speaker(s)
c0ldbru is a solutions architect by day, bringing a practical and problem-solving mindset to the world of hardware. He is the founder and lead hacker at Rot 13 Labs, an organization dedicated to exploring and creating within the hardware space. Additionally, c0ldbru is an organizer for High Roller Con, a significant contributor to the community around conference badges and hardware hacking, evident by the "little ducks everywhere" associated with the event. Despite his impressive contributions, he humbly refers to himself as a "hardware hacker noob," emphasizing that his expertise comes from hands-on tinkering rather than formal electrical engineering training, making his insights particularly relatable and encouraging for aspiring badge makers.